
In this tutorial we will learn how to use a DatePicker in flutter with example.
Flutter DatePicker widget
DatePicker is a material widget in flutter that lets the user select a date. Since there is no widget available for creating datepicker we will use showDatePicker() function. It will display a Material Design date picker in a dialog by calling flutter’s inbuilt function. We will use it in instances like booking a movie ticket, train ticket, etc.
To create a DatePicker in Flutter we will use showDatePicker() which is an asynchronous function. When we call the function it will display the dialog where the user can select a date. It returns the selected date when the user confirms the dialog. If the user cancels the dialog, it will return null. We can display the date anywhere or save it in shared preferences for future use.
Constructor:
showDatePicker (
    {@required BuildContext context,
    @required DateTime initialDate,
    @required DateTime firstDate,
    @required DateTime lastDate,
    DateTime currentDate,
    DatePickerEntryMode initialEntryMode:
    DatePickerEntryMode.calendar,
    SelectableDayPredicate selectableDayPredicate,
    String helpText,
    String cancelText,
    String confirmText,
    Locale locale,
    bool useRootNavigator: true,
    RouteSettings routeSettings,
    TextDirection textDirection,
    TransitionBuilder builder,
    DatePickerMode initialDatePickerMode: DatePickerMode.day,
    String errorFormatText,
    String errorInvalidText,
    String fieldHintText,
    String fieldLabelText
}
)
DatePicker has three required properties initialDate, firstDate and lastDate without which we cannot use the date Picker.
firstDate : It is the earliest date we want the user to choose from.
lastDate : It is the max possible date the user can select.
initialDate : It is the date we want to display when the date picker is displayed for the first time. It should be between firstDate and lastDate.
The date picker will show the month of the date we have provided to the initialDate, with initialDate selected when it is displayed for the first time.
The currentDate represents today’s date & it will be highlighted in the day grid. If we don’t provide any value, it will use the date of DateTime.now().
Creating Datepicker
To create a datepicker in flutter we have to initialize a variable selectedDate of type DateTime which will hold the selected date. But initially we will assign today’s date to it.
DateTime selectedDate = DateTime.now();
Now lets design the UI where we will have an ElevatedButton widget to display the DatePicker dialog. When the user selects the date we will display it in a text widget.
  @override
  Widget build(BuildContext context) {
    return Scaffold(
      appBar: AppBar(
        title: Text("Flutter Datepicker"),
      ),
      body: Center(
        child: Column(
          mainAxisAlignment: MainAxisAlignment.center,
          children: <Widget>[
            RaisedButton(
                onPressed: () {
                  _selectDate(context);
                },
              child: Text("Choose Date"),
            ),
            Text("${selectedDate.day}/${selectedDate.month}/${selectedDate.year}")
          ],
        ),
      ),
    );
  }
As the UI is ready now lets create the method to display DatePicker. We will be using the DateTime variable ‘selectedDate‘ created above for initialDate. We are assigning the selected date to the variable in setState() to update the UI.
_selectDate(BuildContext context) async {
    final DateTime selected = await showDatePicker(
      context: context,
      initialDate: selectedDate,
      firstDate: DateTime(2010),
      lastDate: DateTime(2025),

    );
    if (selected != null && selected != selectedDate)
      setState(() {
        selectedDate = selected;
      });
  }
Flutter Datepicker Example Complete Code
Below is the complete example for where we create a datepicker and show it using showDatePicker function provided by flutter.
import 'package:flutter/material.dart';
void main()
{
  runApp(MyApp());
}
class MyApp extends StatelessWidget {
  @override
  Widget build(BuildContext context) {
    return MaterialApp(
      title: 'Flutter Datepicker',
      theme: ThemeData(
        primarySwatch: Colors.blue,
      ),
      home: MyHomePage(),
    );
  }
}

class MyHomePage extends StatefulWidget {
  @override
  _MyHomePageState createState()
  {
    return _MyHomePageState();
  }
}

class _MyHomePageState extends State<MyHomePage> {
String date = "";
DateTime selectedDate = DateTime.now();
  @override
  Widget build(BuildContext context) {
    return Scaffold(
      appBar: AppBar(
        title: Text("Flutter Datepicker"),
      ),
      body: Center(
        child: Column(
          mainAxisAlignment: MainAxisAlignment.center,
          children: <Widget>[
            ElevatedButton(
                onPressed: () {
                  _selectDate(context);
                },
              child: Text("Choose Date"),
            ),
            Text("${selectedDate.day}/${selectedDate.month}/${selectedDate.year}")
          ],
        ),
      ),
    );
  }

  _selectDate(BuildContext context) async {
    final DateTime selected = await showDatePicker(
      context: context,
      initialDate: selectedDate,
      firstDate: DateTime(2010),
      lastDate: DateTime(2025),
    );
    if (selected != null && selected != selectedDate)
      setState(() {
        selectedDate = selected;
      });
  }
}
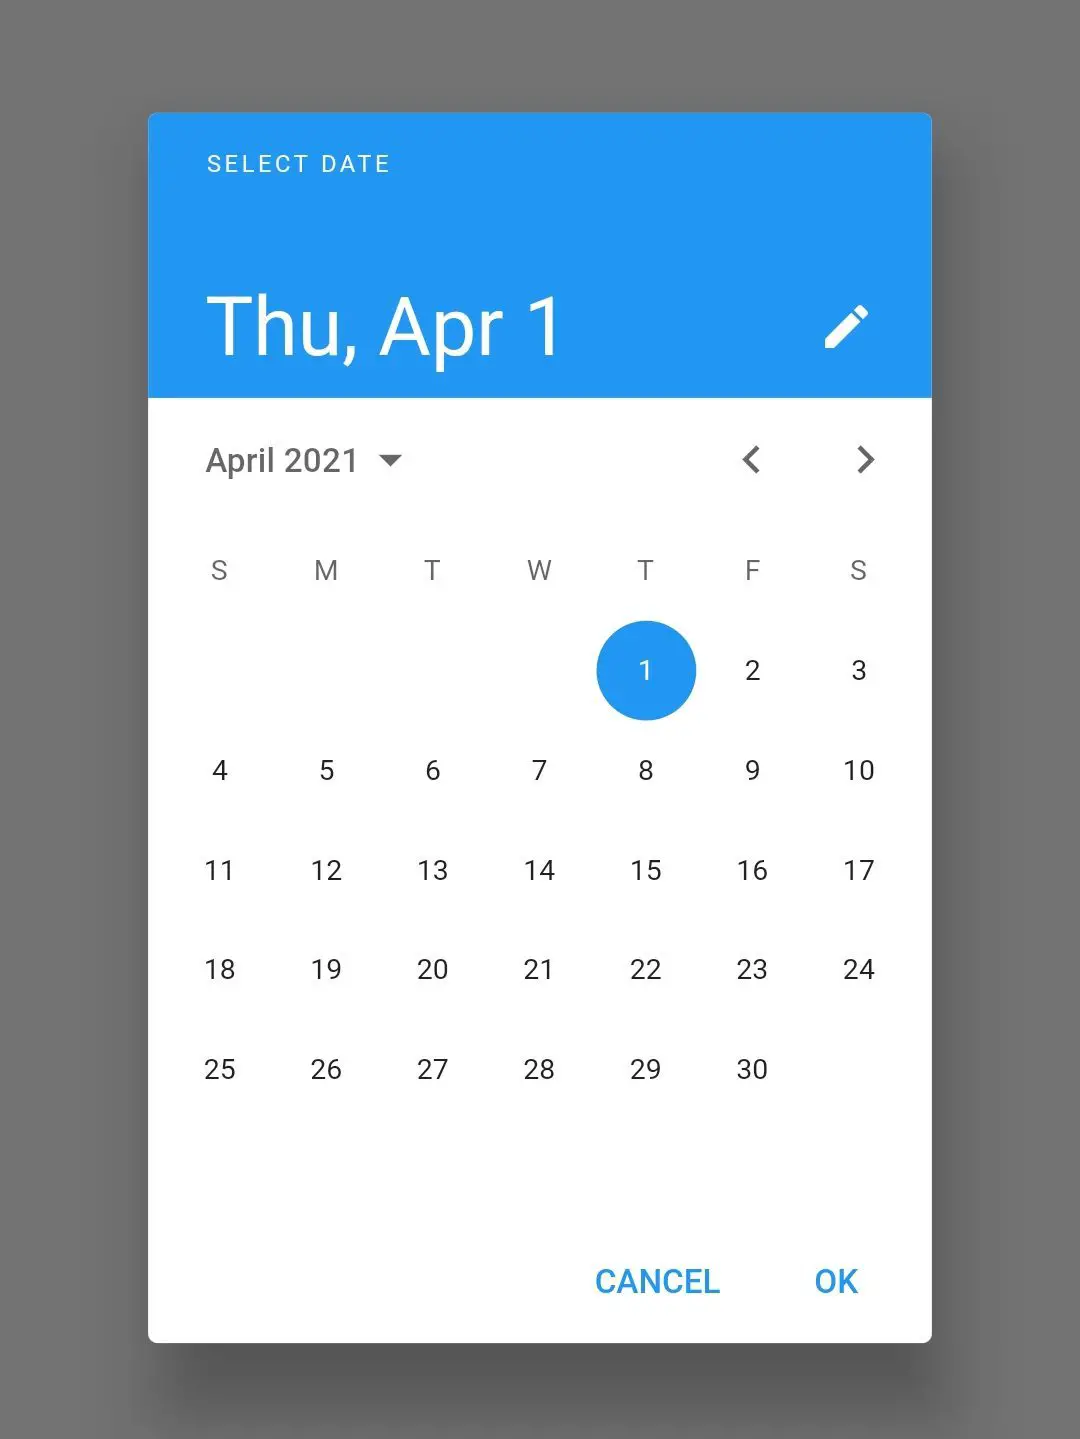
Output:
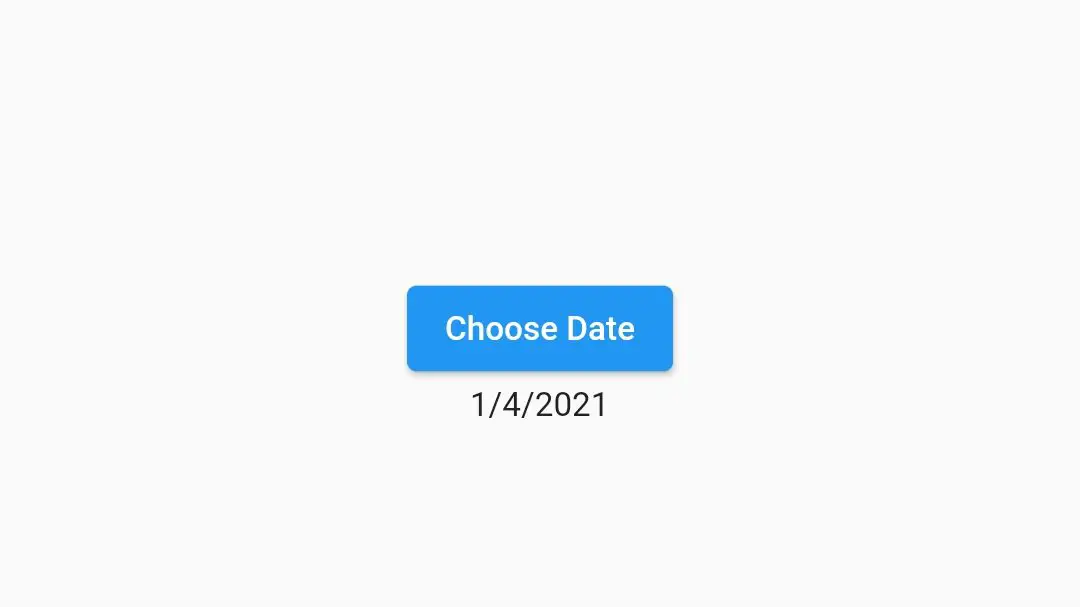
After clicking the button
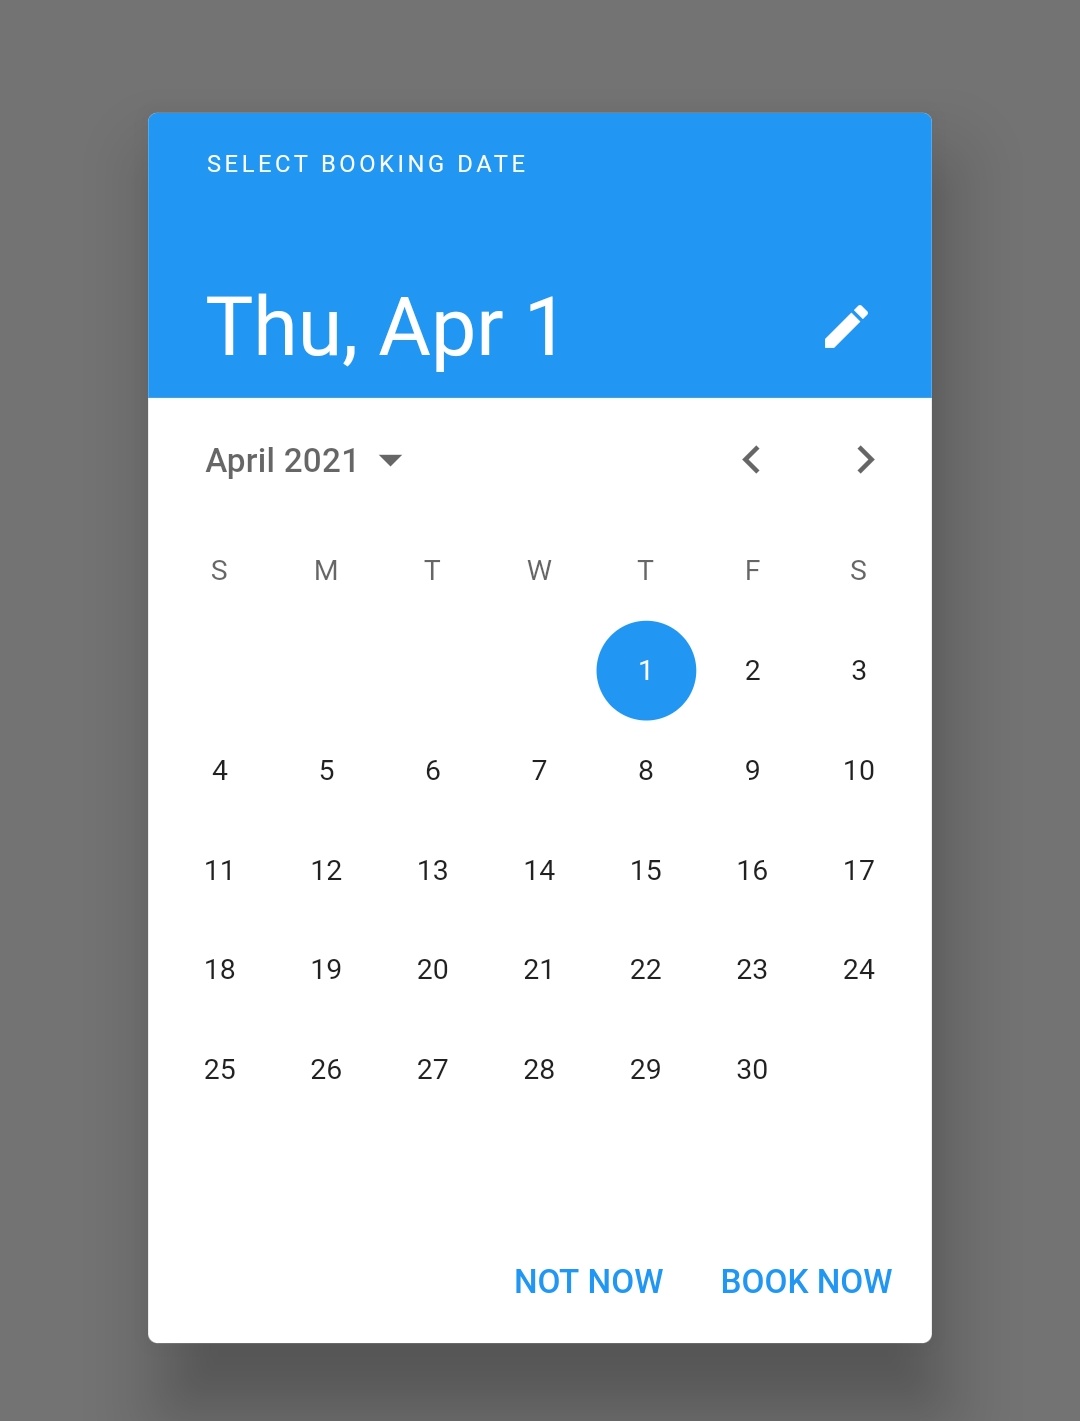
We can change the help text, cancel and ok buttons text of datepicker. we can do so by using the helpText, cancelText and confirmText properties. Let’s see the code below.
showDatePicker(
      context: context,
      initialDate: selectedDate,
      firstDate: DateTime(2010),
      lastDate: DateTime(2025),
      helpText: "SELECT BOOKING DATE",
      cancelText: "NOT NOW",
      confirmText: "BOOK NOW"
    );
Output:
How to change label and hint text of a datepicker
showDatePicker(
      context: context,
      initialDate: selectedDate,
      firstDate: DateTime(2010),
      lastDate: DateTime(2025),
      helpText: "SELECT BOOKING DATE",
      cancelText: "NOT NOW",
      confirmText: "BOOK NOW",
      fieldHintText: "DATE/MONTH/YEAR",
      fieldLabelText: "BOOKING DATE",
    );
Output:
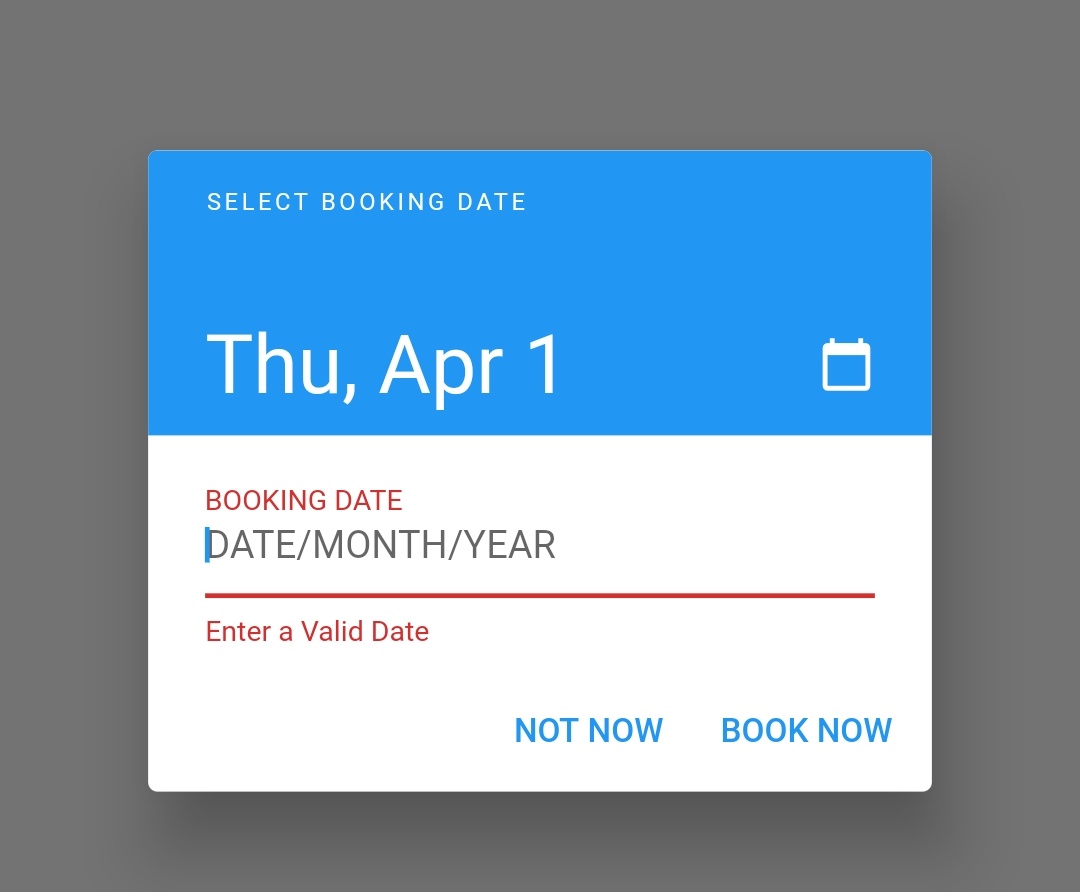
How to change format error and invalid error text
showDatePicker(
      context: context,
      initialDate: selectedDate,
      firstDate: DateTime(2010),
      lastDate: DateTime(2025),
      helpText: "SELECT BOOKING DATE",
      cancelText: "NOT NOW",
      confirmText: "BOOK NOW",
      fieldHintText: "DATE/MONTH/YEAR",
      fieldLabelText: "BOOKING DATE",
      errorFormatText: "Enter a Valid Date",
      errorInvalidText: "Date Out of Range"
    );
Output:
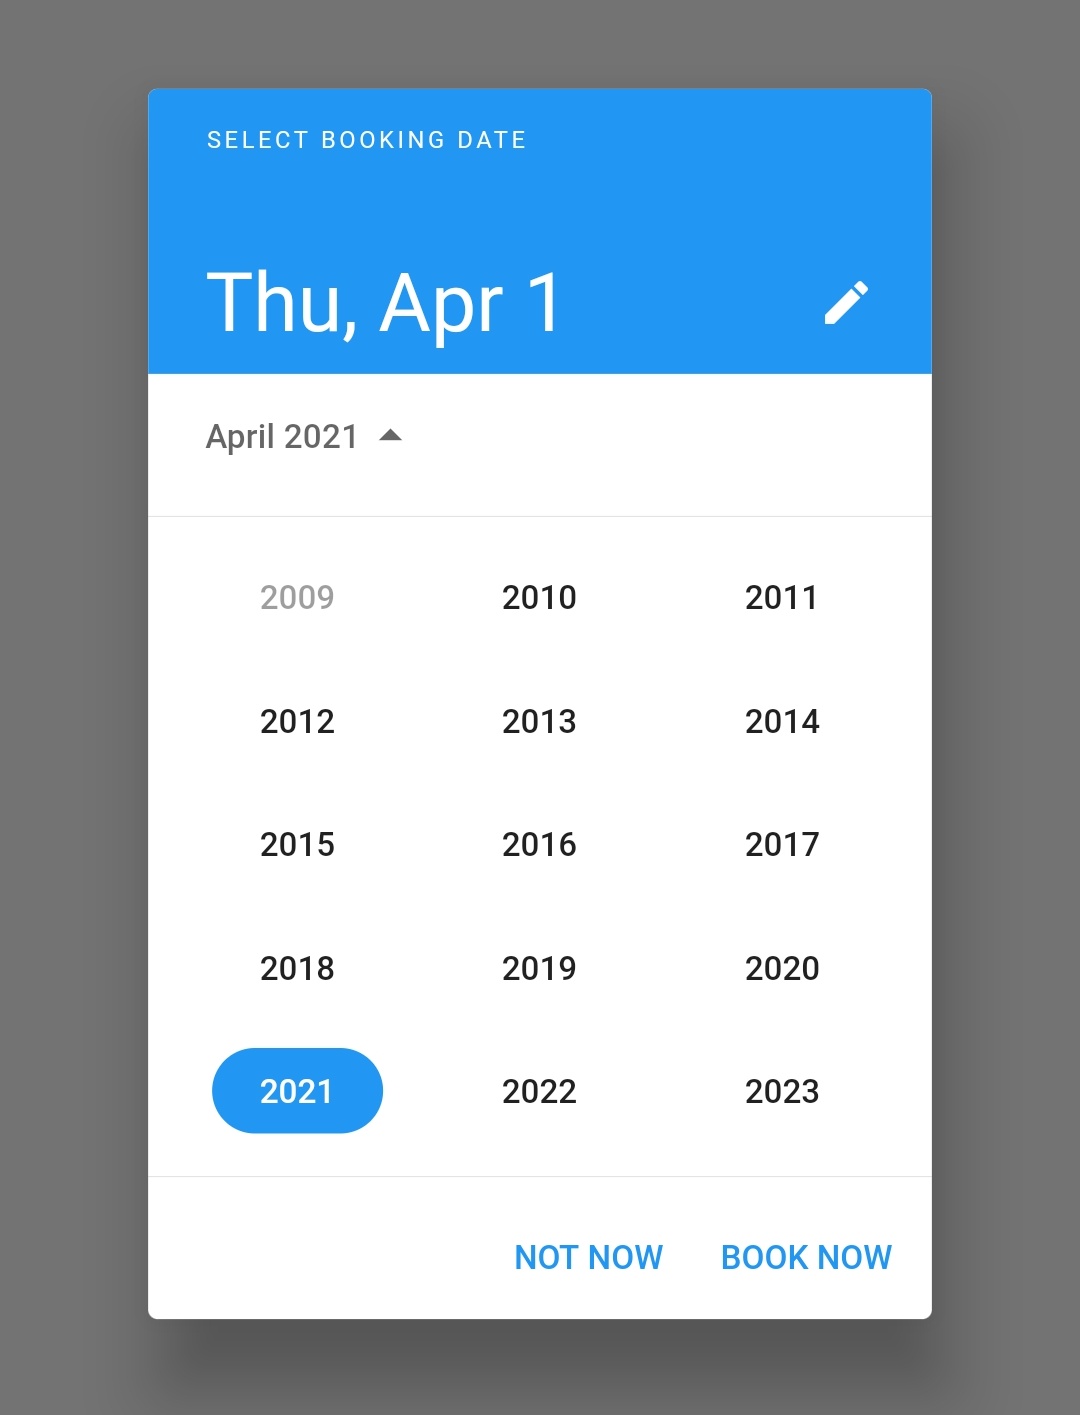
How to display year first in datepicker
showDatePicker(
      context: context,
      initialDate: selectedDate,
      firstDate: DateTime(2010),
      lastDate: DateTime(2025),
      helpText: "SELECT BOOKING DATE",
      cancelText: "NOT NOW",
      confirmText: "BOOK NOW",
      initialDatePickerMode: DatePickerMode.year
    );
Output:
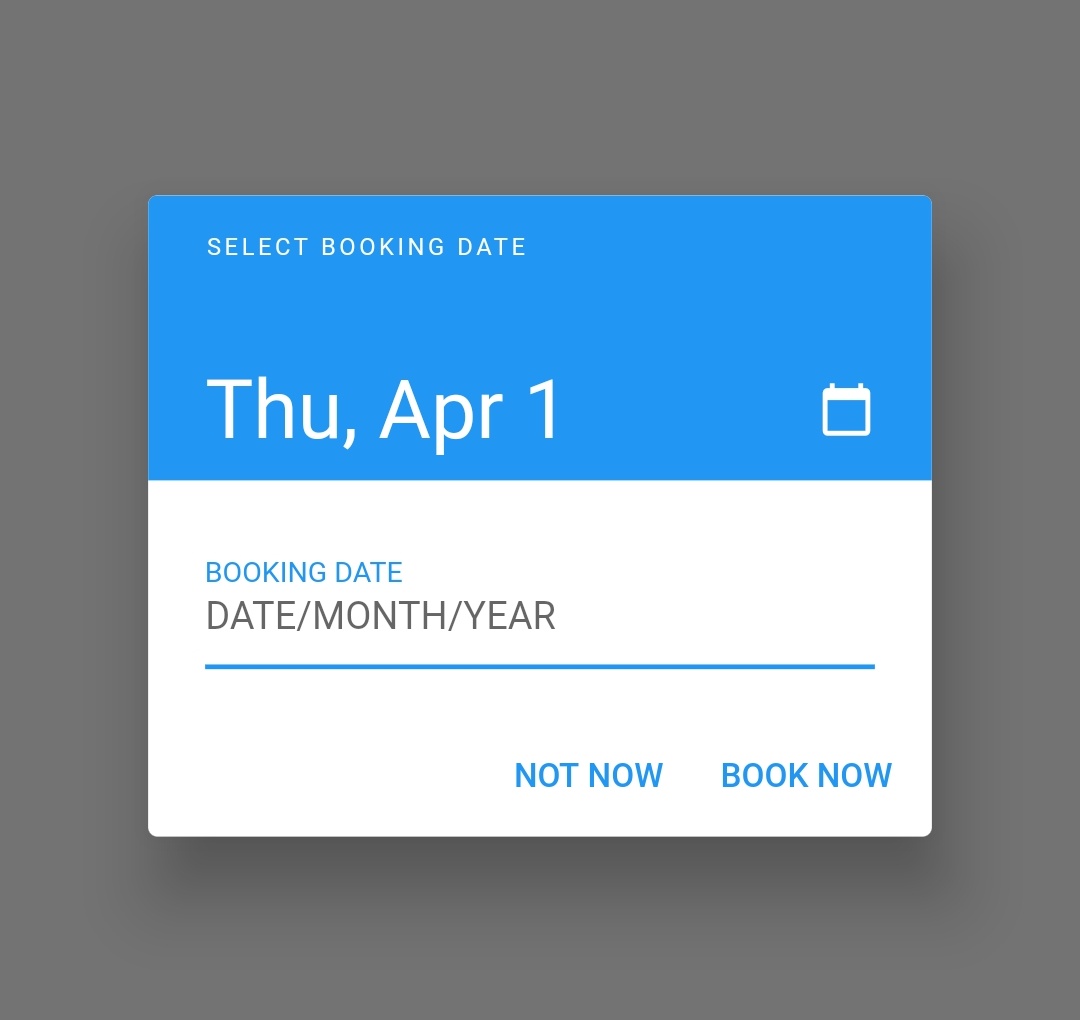
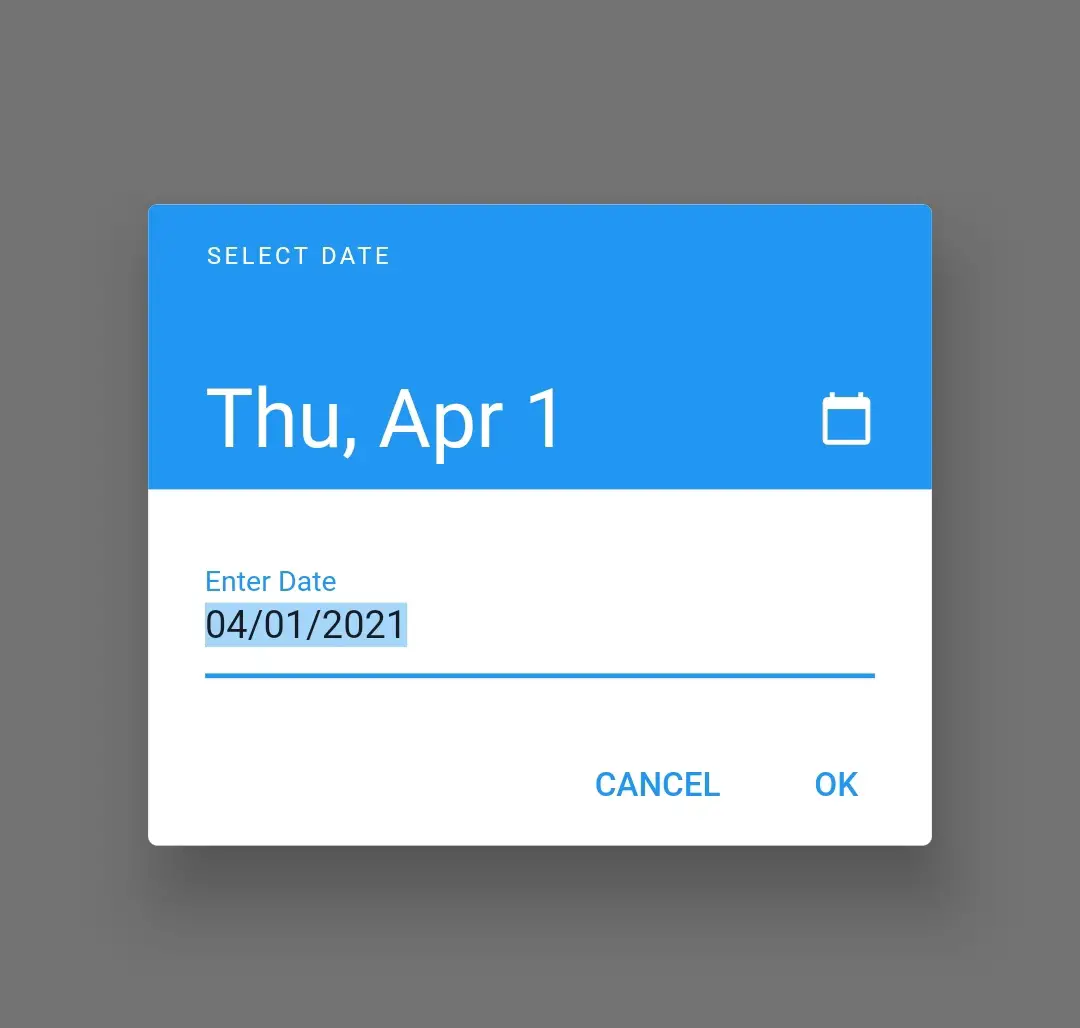
How to show a Text Input instead of calendar in datepicker
We can display a text input to enter the date manually instead of displaying a calendar. We can achieve this by setting the initialEntryMode property with DatePickerEntryMode.input. Let’s see the code and output.
showDatePicker(
      context: context,
      initialDate: selectedDate,
      firstDate: DateTime(2010),
      lastDate: DateTime(2025),
      initialEntryMode: DatePickerEntryMode.input
    );
Output:
That’s all about how to use DatePicker widget in flutter with example. I hope you understand this tutorial. Let’s catch up with some other widget in the next post. Have a great day!!
Do share, comment, subscribe and like my facebook page if you find this post helpful. Thank you!!
Reference: Flutter Official Documentation


Leave a Reply