
In this android layouts tutorial, you will learn about different types of layouts like linearlayout and relativelayout in android and how to implement them with examples.
Android Layouts
In android the layouts are used to create a screen or GUI(Graphical User Interface) by using View class which is base class for UI components like TextView and EditText etc. and ViewGroup which is a subclass of View.Examples of View Group are LinearLaout, RelativeLaout etc,.
In android layouts are created by arranging views and View Groups in an XML(Extensible Markup Language) file.Each layout file(XML file) must contain one root element which can be either a View or View Group and all the child controls like other Views and View Groups are arranged inside the root element to form a layout.
Basic Android Layout Structure
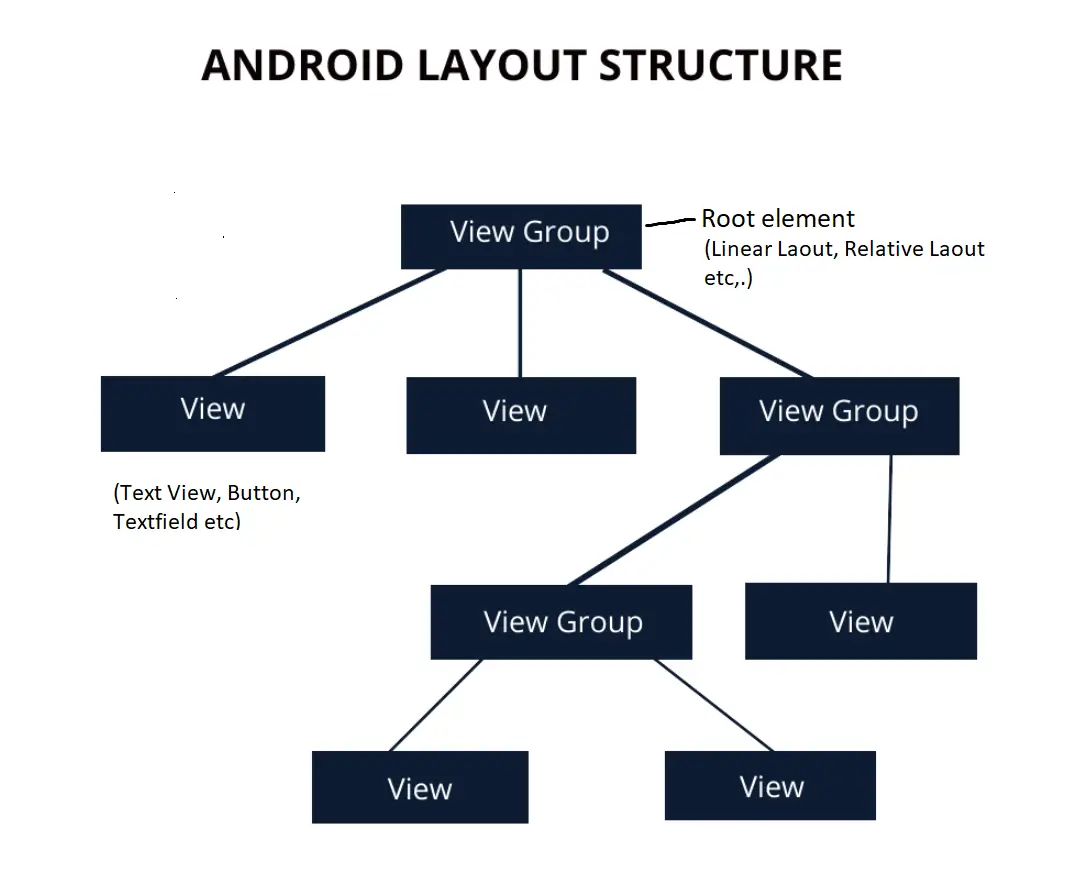
Below snippet is a sample XML file structure in android.If you observe the below code the linear layout is the root element and the edit text is the child(View) and the relative layout another child(View Group).
Example.xml
<?xml version="1.0" encoding="utf-8"?>
<LinearLayout xmlns:android="http://schemas.android.com/apk/res/android"
    xmlns:app="http://schemas.android.com/apk/res-auto"
    xmlns:tools="http://schemas.android.com/tools"
    android:layout_width="match_parent"
    android:layout_height="match_parent"
    android:background="@color/white"
    android:orientation="vertical"
    android:padding="20dp"
tools:context="androidlaouts.codesinsider.com.androidlayouts.LinearLayoutExample">

   <EditText
       android:layout_width="match_parent"
       android:layout_height="wrap_content"
       android:layout_marginTop="60dp"
       android:layout_marginBottom="20dp"
       android:hint="@string/username"
       android:textSize="16sp"
       android:textColor="@color/black"/>

   <RelativeLayout
       android:layout_width="match_parent"
       android:layout_height="match_parent"
       android:layout_marginTop="20dp"
       android:layout_marginBottom="20dp">

       <EditText
            android:layout_width="match_parent"
            android:layout_height="wrap_content"
            android:layout_marginTop="60dp"
            android:layout_marginBottom="20dp"
            android:hint="@string/username"
            android:textSize="16sp"
            android:textColor="@color/black"/>
   </RelativeLaout>

</LinearLayout>
Android Layout Types
Android provides different types of layouts that can be used in the wide range of android applications.
1. Linear Layout
2. Relative Layout
3. Table Layout
4. Absolute Layout
5. Frame Layout
6. Constraint Layout
7. Tab Layout
8. Grid View
9. List View
10. Recycler View
11. Web View
Android Layout Attributes
android:id : This is the id to identify the view and it is unique.Android id looks like @+id/your desired name.Eg @+id/phone.
android:layout_width : This defines the width of the layout.We can use two values for layout width or define your desired width in dp(density independent pixels) like android:layout_width=”200dp”.
1. match_parent: This takes the width of the parent view.
2. wrap_content: This adjusts width based on content inside the layout.
android:layout_height : This defines the height of the layout.Here also we have to use one of the above values or define your desired value.
android:layout_margin : This will leave some space outside the layout or view.For example if we define android:layout_margin_end=”10dp” it will leave 10 dp space at the end of the view.If you want outer space for all the four sides of a view you can use android:layout_margin or else you can define to which side you want by using below attributes.
1. android:layout_margin_start
2. android:layout_margin_end
3. android:layout_margin_top
4. android:layout_margin_bottom
android:layout_padding : Padding is similar to margin but the difference is padding maintains internal spacing ie,. padding maintains space between the edge of the view and elements present inside the view.
android:gravity : This defines how to arrange the position of the child view present inside the layout.Gravity can be center, top, bottom, left, right.
android:layout_gravity : This is similar to gravity but this attribute positions the layout instead.
android:layout_weight : This defines how much space should be allocated to a view inside the layout.For example android:layout_weight:”1″.
There are few more attributes but above mentioned attributes are commonly used ones while using layouts.
android:visibility : This is used to show or hide the layout/control.It has three values visible, invisible, gone.when visible it displays the layout, when invisible it takes space on the screen but becomes invisible displaying blank space and when gone it completely disappears like it never existed.
Now lets discuss the most commonly used layouts in android application development.
- Linear Layout
- Relative Layout
Android Linear Layout
Linear Layout the name itself indicates that the elements are arranged in linear fashion ie,. the elements in linear layout are arranged either horizontally or vertically.We can define the beheaviour by using the orientation attribute.
For example android:orientation=”vertical” makes the linear layout display elements vertically and android:orientation=”horizontal” displays elements horizontally.By default the orientation for linear layout is horizontal.
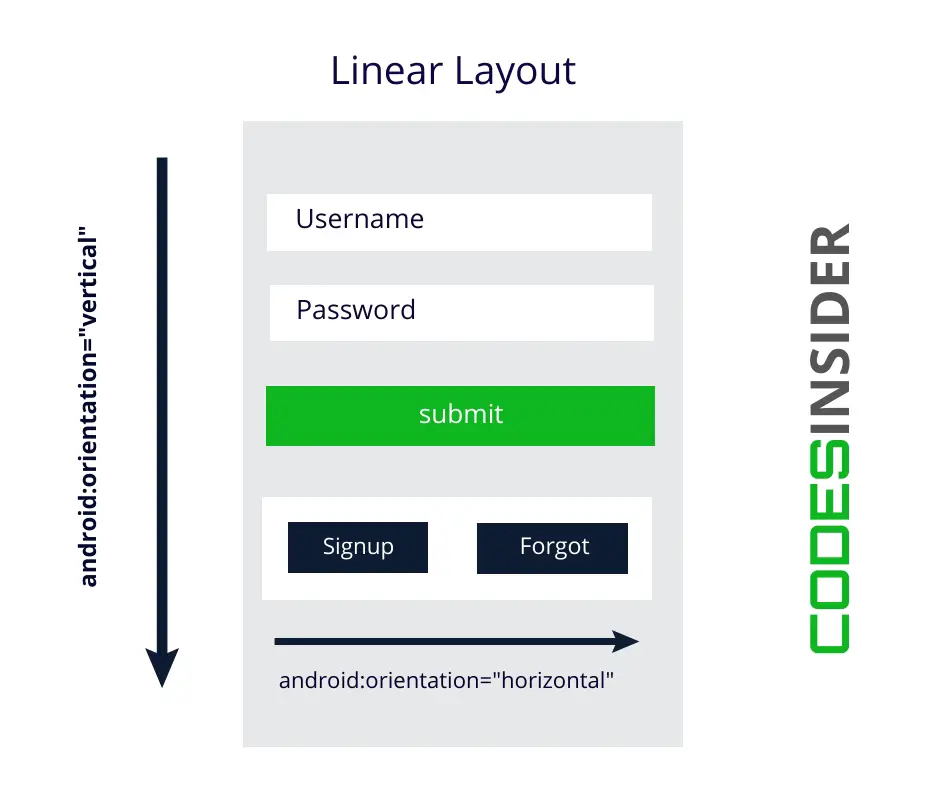
If you observe the above diagram the root layout orientation is vertical so the views are arranged vertically but the last view(which is actually a view group) is a linear layout with orientation horizontal so the two buttons are arranged horizontally.
Lets see the above diagram implementation programatically
linear_layout.xml
<?xml version="1.0" encoding="utf-8"?>
<LinearLayout xmlns:android="http://schemas.android.com/apk/res/android"
    xmlns:app="http://schemas.android.com/apk/res-auto"
    xmlns:tools="http://schemas.android.com/tools"
    android:layout_width="match_parent"
    android:layout_height="match_parent"
    android:background="@color/white"
    android:orientation="vertical"
    android:padding="20dp"
   tools:context="androidlaouts.codesinsider.com.androidlayouts.LinearLayoutExample">

   <EditText
       android:layout_width="match_parent"
       android:layout_height="wrap_content"
       android:layout_marginTop="60dp"
       android:layout_marginBottom="20dp"
       android:hint="@string/username"
       android:textSize="16sp"
       android:textColor="@color/black"/>

    <EditText
        android:layout_width="match_parent"
        android:layout_height="wrap_content"
        android:layout_marginTop="0dp"
        android:layout_marginBottom="20dp"
        android:hint="@string/password"
        android:textSize="16sp"
        android:textColor="@color/black"/>

    <Button
        android:layout_width="match_parent"
        android:layout_height="wrap_content"
        android:background="@color/colorPrimaryDark"
        android:textColor="@color/white"
        android:text="@string/login"
        android:textSize="16sp"/>

    <LinearLayout
        android:layout_width="match_parent"
        android:layout_height="wrap_content"
        android:orientation="horizontal"
        android:weightSum="2"
        android:layout_marginTop="20dp">

        <TextView
            android:layout_width="wrap_content"
            android:layout_height="wrap_content"
            android:text="@string/forgot_password"
            android:textSize="16sp"
            android:textColor="@color/black"
            android:layout_weight="1"
            android:layout_gravity="center"
            android:gravity="center"/>

        <TextView
            android:layout_width="wrap_content"
            android:layout_height="wrap_content"
            android:text="@string/register"
            android:textSize="16sp"
            android:textColor="@color/black"
            android:layout_weight="1"
            android:layout_gravity="center"
            android:gravity="center"/>

    </LinearLayout>

</LinearLayout>
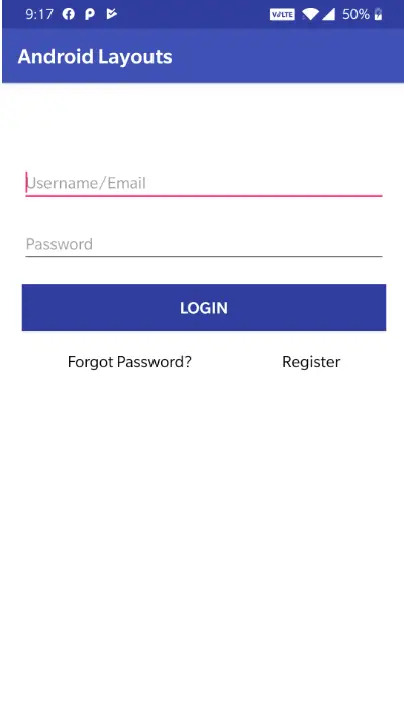
The output of the above code will be like this.
Android Relative Layout
In android relative layout the elements or views are arranged in two ways one is with respect to other views in the layout and the other with respect to parent layout.
For example if we define an attribute like android:layout_toEndOf=”@+id/login” for a view makes the view display parallely right to the view with id “login”.Similarly if we define attribute like android:layout_alignParentBottom=”true” for a view makes the view positioned at the bottom of the parent view.
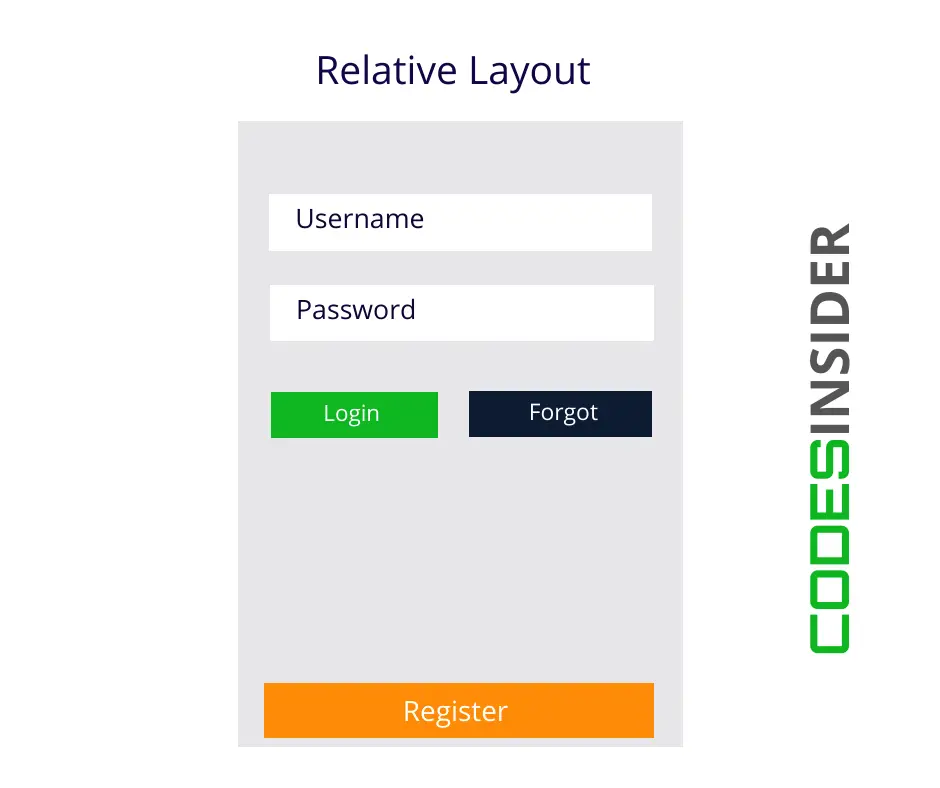
If we observe above diagram clearly the forgot button is positioned right to login button.Lets see the code for the same.
    <Button
        android:id="@+id/login"
        android:layout_width="wrap_content"
        android:layout_height="wrap_content"
        android:background="@color/green"
        android:textColor="@color/white"
        android:text="@string/login"
        android:textSize="16sp"
        android:layout_below="@+id/email"/>

    <Button
        android:id="@+id/forgot"
        android:layout_width="wrap_content"
        android:layout_height="wrap_content"
        android:background="@color/blue"
        android:textColor="@color/white"
        android:text="@string/forgot_pwd"
        android:textSize="16sp"
        android:layout_below="@+id/email"
        android:layout_toEndOf="@+id/login"
        android:padding="10dp"
        android:layout_marginStart="20dp"/>
and the register button is positioned with respect to parent.The code snippet will be like below
<Button
        android:id="@+id/register"
        android:layout_width="match_parent"
        android:layout_height="wrap_content"
        android:background="@color/colorPrimaryDark"
        android:textColor="@color/white"
        android:text="@string/register"
        android:textSize="16sp"
        android:layout_alignParentBottom="true"/>
Lets see how to implement the above diagram programatically in XML.
relative_layout.xml
<?xml version="1.0" encoding="utf-8"?>
<RelativeLayout xmlns:android="http://schemas.android.com/apk/res/android"
    xmlns:app="http://schemas.android.com/apk/res-auto"
    xmlns:tools="http://schemas.android.com/tools"
    android:layout_width="match_parent"
    android:layout_height="match_parent"
    android:background="@color/white"
    android:padding="20dp"
    tools:context="androidlaouts.codesinsider.com.androidlayouts.RelativeLayoutExample">

    <EditText
        android:id="@+id/email"
        android:layout_width="match_parent"
        android:layout_height="wrap_content"
        android:layout_marginTop="60dp"
        android:layout_marginBottom="20dp"
        android:hint="@string/username"
        android:textSize="16sp"
        android:textColor="@color/black"/>


    <Button
        android:id="@+id/login"
        android:layout_width="wrap_content"
        android:layout_height="wrap_content"
        android:background="@color/colorPrimaryDark"
        android:textColor="@color/white"
        android:text="@string/login"
        android:textSize="16sp"
        android:layout_below="@+id/email"/>

    <Button
        android:id="@+id/forgot"
        android:layout_width="wrap_content"
        android:layout_height="wrap_content"
        android:background="@color/colorPrimaryDark"
        android:textColor="@color/white"
        android:text="@string/forgot_pwd"
        android:textSize="16sp"
        android:layout_below="@+id/email"
        android:layout_toEndOf="@+id/login"
        android:padding="10dp"
        android:layout_marginStart="20dp"/>


    <Button
        android:id="@+id/register"
        android:layout_width="match_parent"
        android:layout_height="wrap_content"
        android:background="@color/colorPrimaryDark"
        android:textColor="@color/white"
        android:text="@string/register"
        android:textSize="16sp"
        android:layout_alignParentBottom="true"/>

</RelativeLayout>
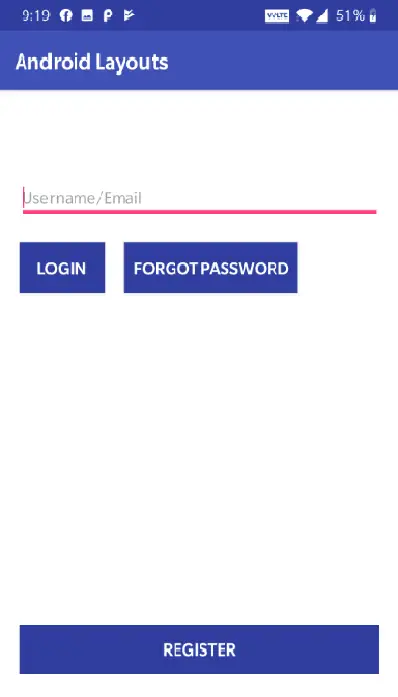
The output of the above code will be
Relative Layout Attributes
There are various layout attributes for relative layout with respect to parent and with respect to other child views.
Relative To Parent Layout
android:layout_alignParentTop: Setting this value to “true” aligns the position of the current element at top of parent layout.
android:layout_alignParentBottom: Setting this value to “true” aligns the position of the current element at bottom of parent layout.
android:layout_alignParentStart: Setting this value to “true” aligns the position of the current element at start/left of parent layout.
android:layout_alignParentEnd: Setting this value to “true” aligns the position of the current element at end/right of parent layout.
android:layout_centerInParent: Setting this value to “true” aligns the position of the current element at end/right of parent layout.
android:layout_centerHorizontal: Setting this value to “true” aligns the position of the current element horizontally center in parent layout.
android:layout_centerVertical: Setting this value to “true” aligns the position of the current element vertically center in parent layout.
Relative To Other Elements
android:layout_below: Aligns the element below the specified element.
android:layout_above: Aligns the element above the specified element.
android:layout_toEndOf: Aligns the element to right of the specified element.
android:layout_toStartOf: Aligns the element to left of the specified element.
Important : Child elements/views belongs to different relative layouts cannot be considered as siblings and cannot be arranged relative to each other.Those which belong to same relative are considered as siblings and can be arranged relative to each other.
Alignment With Other Elements
android:layout_alignBaseline : Aligns baseline of the current element with respect to baseline of the defined element.
android:layout_alignTop : Aligns the top of current element with the top of the defined element
android:layout_alignBottom : Aligns the bottom of current element with the bottom of the defined element.
android:layout_alignLeft : Aligns the left side edge of current element with the left side edge of the defined element.
android:layout_alignRight : Aligns the right side edge of current element with the right side edge of the defined element.
With these above defined 5 attributes the elements overlap with other defined elements based on a particular side or edge.
Code snippet to launch the Activity which loads the layout.
AndroidLaouts.java
package androidlaouts.codesinsider.com.androidlayouts;

import android.support.v7.app.AppCompatActivity;
import android.os.Bundle;

public class LayoutExample extends AppCompatActivity {

    @Override
    protected void onCreate(Bundle savedInstanceState) {
        super.onCreate(savedInstanceState);
        setContentView(R.layout.activity_linear_laout_example);
    }
}
The below line in the above code loads the linear layout(linear_layout.xml) that we designed and displays it on our device or emulator.
setContentView(R.layout.linear_layout);
Replace the above line of code with the code below to load relative layout.
setContentView(R.layout.relative_layout);
We just discussed what are android layouts and walked through two types of layouts LinearLayout, RelativeLayout in detail.We will discuss about the remaining layouts and other stuff in next posts.Have a great day!!
Do like and share if you find this post helpful.Thank you!!


Leave a Reply